The Click 2 Crop preset manager allows you to easily edit a list of presets that contain various
image cropping and editing configurations. You can add your own custom presets, delete
unnecessary ones, and reorder them for better organization.
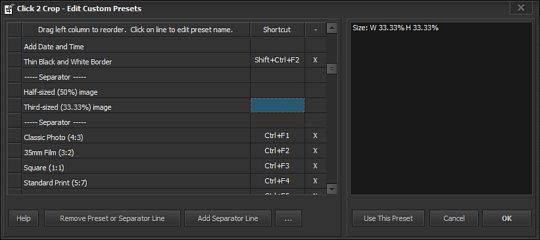
At right-hand side of this panel it displays a brief description of the selected preset. On the left
side there is a table presets. This is a quite common table . You can reorder rows dragging them
with the mouse. (Click and drag cells at left-hand column) To change the name please double-click on the row and it will go into edit mode.
To assign a new shortcut key, double-click on the Shortcut cell next to the desired preset item
and type in your preferred key combination.
To remove a shortcut key, double-click on the "X" in the shortcut cell.
When you assign a shortcut combination that is already assigned to another Click 2 Crop
function, the program will display an alert window asking if you want to reassign the shortcut. This
means the new shortcut will be assigned to the function you selected, and the previous function
will lose its shortcut.
To delete a row use the Remove preset or separator line button. To add a separator, use Add
separator line button.
Use the drop down button beside for more complex changes.
You can restore the original preset set using Reset to defaults.
You can save all the presets to a file using Save my presets to file.
Use the Append presets from file to add presets from previous saved file.
To delete all the presets, including the pre-installed ones use Delete all presets.
You can apply the chosen preset with Use this preset button.