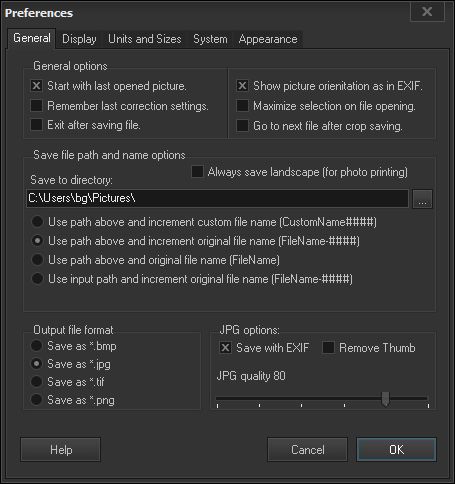
General options
Start with last opened picture.
If this check box is checked Click 2 Crop will open last opened picture at the start of next session.
Remember last correction settings
If this checkbox is checked Click 2 Crop will remember last settings that was used for image correction.
When you will start Click 2 Crop next time settings for sharpening, autolevels, gamma, text and borders
will be restored.
Exit after saving file
If this checkbox is checked Click 2 Crop will be closed after you save cropped image.
Show picture orientation as in EXIF
If this check box is checked Click 2 Crop will rotate your input image according information in EXIF
header. This option could be useful if you browse through photos from digital cameras that was not
edited yet.
Note: Some image editor programs may erase EXIF header - in this case Click 2 Crop will show image
as it is.
Another situation will be if you have rotate your photo and editor leave EXIF header "Orientation" entry
not changed. In this case the image will be shown with extra rotation. Because of all possible problems
described above this check box is unchecked by default.
Maximize selection on file opening.
If this check box is checked Click 2 Crop will be select maximum allowed area when next picture will be
loaded.
Save file path and name options
Always save landscape (for photo printing) - some photolabs can not print "portrait" oriented photos.
When this option is enabled all your cropped images will be saved as "landscape", i.e. if your crop is
"portrait" oriented it will be 90° rotated before saving.
Save to directory:
Select a folder where you like to save cropped images.
Save file path and name options
Use path above and increment custom file name (CustomName####)
If this radio button is checked program will save cropped image with incremented custom name into
selected folder. The custom name don't changes as far as you don't change it yourself.
Use path above and increment original file name (FileName-####)
If this radio button is checked program will save cropped image into selected folder as a file with original
filename and added incremented part. All cropped files will be placed in one selected folder.
This would result in a file list something like this:
PA070080-0001.JPG 1st cropped image from PA070080
PA070080-0002.JPG 2nd cropped image from PA070080
Use input path and increment original file name (FileName-####)
If this radio button is checked program will save cropped image into selected folder as your input files
with original filename and added incremented part.
This would result in a file list something like this:
PA070080.JPG Original PA070080
PA070080-0001.JPG 1st cropped image from PA070080
PA070080-0002.JPG 2nd cropped image from PA070080
PA070081.JPG Original PA070081
PA070081-0001.JPG 1st cropped image from PA070081
PA070082.JPG Original PA070082
In this manner, the cropped images sort together with the image they came from.
Don't show initial Save As dialogue
If checked - Click 2 Crop will be not prompt you with Save As dialogue when saving first crop in working
session. It will use last used path preferences from last working session. This option can be handy when
working along with Exit after saving file and Use input path and increment original file name and Add system rightclick context menu. See Workflow examples for details.
Output file format
Select file format type for saving here.
Save as *.bmp - save as Windows bitmap.
Save as *.jpg - save as jpeg file format. To set jpeg compression use a slider bar below.
Save as *.tif - save as Tiff file format.
JPG options:
Save with EXIF - All additional EXIF information will be saved intact with your cropped image file.
Remove Thumb - Additional EXIF information will be saved with your cropped image file except preview
thumbnail.
JPG quality - Set jpeg quality/compression rate here. General rule: more quality will give more file size.
Note: Saving with EXIF will increase jpeg image file size.
EXIF with preview thumbnail will add about 15 Kb to the file size.
EXIF without preview thumbnail will add about 1 Kb to the file size.
If you prepare your images for website and want them as small as possible you don't need keep EXIF.


 Tip:
Tip:
You may set up all saving settings right before saving your first crop in serial. Extended Save As
Dialogue allow you fast and easy set without using Preferences Screen.
Cancel
Exit this screen without saving.
OK
Save preferences and exit this screen.