Click 2 Crop — How it works

When you work with Click 2 Crop your workflow is very simple:
1 - Open image.
2 - Pan and resize cropping frame.
3 - Save image.
4 - Go to #1.
Below are detailed descritions of these steps:
1 - Open image.

There are number of ways to open an image:
You may drop image from finder on Click 2 Crop icon.
You may select Open with Click 2 Crop from system image context menu.
You may run Click 2 Crop and use Open button.
You may drop image file on Click 2 Crop's left image panel.
As soon as you have opened the first image, Click 2 Crop is ready to process all images in the folder where your fist image is located. You may browse and view these images with Next and Previous button. Alternatively You may use Page Down and Page Up keys to browse images.
Also you may drop picture on Click 2 Crop's left image panel from Safari, Mail, FireFox of any other application that supports picture dragging.
Click 2 Crop integrated with Grab service. You may capture monitor screen selecting from menu Click 2 Crop - Services - Grab.
2 - Pan and resize cropping frame.
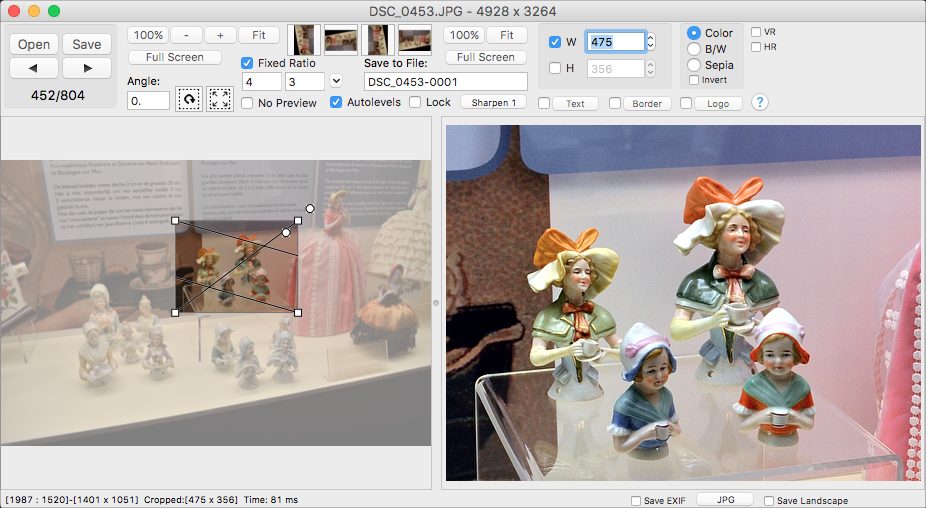
First of all, Click 2 Crop is a cropping tool. It means that you don't need to do any efforts to activate a cropping frame. Cropping frame is already active and visible. Simple drag and resize it with your mouse.
For a fine tune of the cropping frame size and location you may to use arrow keys. One key press moves the cropping frame by one pixel. Use Ctrl key to move the cropping frame by 10 pixels per one key press. If you keep Shift key pressed while using arrow keys, program changes the cropping frame size instead of it's position.
While resizing, you are seeing a live preview of your cropped image on the right panel of the program.
For proportional resizing of the cropping frame - simple select Fixed Aspect option. You may select one of predefined general used aspect rations (like 4x3, 3x2, 16x9 and so on) from Aspect Ratio menu. You may check on Fixed Aspect checkbox to lock cropping frame proportions as they are. To fine tune these proportions you may enter proportion numbers into appropriate text boxes.
3 - Save image.

You may save image with Save button.
You may save image selecting Save from File menu. (or using Save menu hot-keys)
You may save image by double clicking on cropping frame.
As an alternative you may drag image from the program's right panel (a panel with preview) and drop it into any folder in finder, or in any application that can accept dropped images. For example, you may drop cropped image into Mail application.
Click 2 Crop asks you for output location and filename only once, at the first crop in session. All sequential saved files are saved into the same folder with incremented name.
If you want to change output location, you may bring up a save dialogue selecting Save… menu option. All following files will be saved into the new selected output location.
Sometimes, while saving whole photo serial into one location you need to save one "exceptional" file into some different place. In this case Save as… menu helps you. It brings up saving dialogue for only one file. That is your main output location will remain the same.
You may select a format of saving file (.jpeg, .tiff or .png) with save dialogue. All following files are saved with the same format. You may to change output file format in the middle of the session with combo box at the bottom of the main program window. And, please don't forget that you may to invoke saving dialogue at any time with Save… menu option.
Image Resizing, rotation, and additional options

While cropping you may resize and rotate output image.
You may rotate image with a few different ways.
For simple 90 degrees rotation please use four big buttons on the top.
For a fine rotation, please use two round Rotation Handles near the right top corned of the cropping frame.
As an alternative you may input rotation degrees number (up to one hundredth of degrees) in the appropriate text field.
Cropping guide lines
Cropping with Click 2 Crop will improve a composition of your photo. There are special Cropping Guide Lines that are helping you to compose a photo according with so called Photo Composition Rules. Most known photo composition rule is Rule of third, where your image is divided by three with imaginary vertical and horizontal lines, and you're supposed to place points of interest of your photo near points of intersections of these lines. With Click 2 Crop these imaginary lines are visible on the cropping frame. Beside Rule of third Click 2 Crop have some more composition rule lines sets: Golden Section Thirds, Diagonals, Harmony Triangles and so on.
Text captions and line borders

You may add up to two multiline text captions. These captions can be simple text lines or special placeholder characters that will be replaced with such information as file name, date, size and so on. You may configure caption size, color, font face and position.
You may add up to three line borders. You may setup line colors, thickness and positions.
Image Sharpening
You may sharpen output image.
Color Conversion

You may convert your photo to Black and white or sepia on the fly. Simple check on the radio button.
Image Flips
You may flip image horizontally and vertically