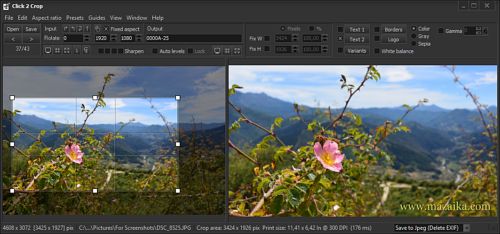
Opens file list screen. You may select drive folder and needed file type(s) here. When you start the
program next time last opened folder will be opened.
Go to previous or next picture in the selected folder. As far as it is very essential function you may use
few different ways to use for this:
1 - click on these buttons
2 - select from menu - View - Next/Previous picture
3 - select from popup menu by rightclick on input image
4 - Press keyboard keys. By default Page Up is for previous and Page Down for Next but you may
assign other keys in a Preferences screen.
Saves current cropped picture with incremented name to the current "save folder". When saving first
time in session program will prompt you for a folder. If you want to change this folder you can click +
button with Right Mouse button (or click with Ctrl keyboard key pressed) to bring up the prompt "Save
As" dialogue again. Also you can use Preferences screen to change
"save folder". As far as a main goal
of this utility is easy saving of manually cropped images you may save crops in a few different ways: 1 - click on this button
2 - double click on input image
3 - select from menu - Files - Save crop
4 - select from popup menu by rightclick on input image
6 - Press keyboard key. By default it is F7 key but you may assign other keys in a Preferences
screen.
Show Input or Output picture in full screen mode.
Fit Input or Output picture to window size.
Show Input or Output picture in actual size.
Rotate Input picture 90° clockwise. Click with left mouse button will rotate picture only. Click with right
mouse button will rotate picture and cropped area together.
Rotate Input picture 90° counterclockwise. Click with left mouse button will rotate picture only. Click with
right mouse button will rotate picture and cropped area together.
Rotate Input picture 180°. Click with left mouse button will rotate picture only. Click with right mouse
button will rotate picture and cropped area together.
Rotate Input picture 0°, i.e. restore original layout. Click with left mouse button will rotate picture only.
Click with right mouse button will rotate picture and cropped area together.
Rotate cropping area 90° i.e. toggle portrait and landscape cropping layout.
Use these three checkboxes to sharpen output image. Check one left checkbox to sharpen output
picture once. Two checked checkbox will sharpen picture twice and all three checked checkbox will
sharp image three times. Usually you need apply sharpen option when you had to downsample larger
images to display as a smaller images on web pages or in emails or thumbnails and want these small
images looks sharp and clear.
This Auto levels option works like a similar option in PhotoShop. You may improve colors and contrast
with it. Lock checkbox will lock autolevels settings and allow you to use same settings for a different
cropped area.
When checkbox right to Gamma control value is checked - output image will be gamma corrected.
Please note that normal gamma setting for this program is 0.
When checkbox is checked you will see current variant color correction in the output window. If you will
uncheck it you will see not corrected image.
To use instant white balance correction press Ctrl + RightMouse button over neutral gray area of the
output image. I.e. you need to press Ctrl keyboard key and click with Right Mouse button over some
"would be" gray area of the picture. Also see instant white balance correction
topic.

Output in color modes: color, grayscale (black and white) or sepia modes.
Input picture panel:
Fixed crop aspect checkbox:
When this checkbox is checked you can resize crop area proportionally. When unchecked - you can free
resize crop area.
Rotate value:
You may rotate input image on any angle. There are also presets for rotation to 90 or 180 degrees and
to repeat last used rotation in Menu Edit and in the right click popup menu.
X aspect and Y aspect values:
You may input needed crop area aspect ratio here or may use presetted aspects from Menu Edit
-
Aspect ratio or Presets.
Output picture panel:
Current file name edit box:
This is a file name that will be used for a current saved crop. After saving file name will be incremented.
By default program adds four digits after character filename and increments these digits.

Fix X and Fix Y checkboxes and edit boxes:
To save cropped areas with their original sizes uncheck both checkboxes. If you need fixed height with
proportionally sized width check height checkbox and input needed value. Use same procedure for fixed
width.
You may select size by pixels or percents of the original image size.
To stretch or shrink output image out of proportions fix both width and height. This feature can be used
for example if you prepare some images as a backgrounds to anamorphic DVD menus.